Monday, December 30, 2013

Winter for the Birds

If you live in a cooler climate, you are probably aware of how difficult winter can be for the birds. The trees are bare, the ground is covered in snow, and the insects are sparse. Now, in a world where habitat grows more and more sparse as houses and building bloom, birds struggle more and more with finding food and shelter for the winter. In fact, many birds have grown to depend on the generosity of humans leaving seeds and other fatty meals out for them in the winter. Since birds have such high metabolisms and require substantial energy to fly and stay warm; food at the feeder has become a matter of life and death to many of our winter visitors.


While making sure to keep a fully stocked feeder (both seed and suet are a great idea), there are other things you can do to help the birds even more this winter. To give you some ideas, I will tell you what we did for our birds this winter.

Bird Treat Muffins


On Christmas Eve, my two year old son and my one month old son were busy helping me start a new tradition: making muffins for the birds to put out on Christmas morning. These nutritious high-fat and fruity muffins are wonderful for the birds...though the squirrels also think they are delicious. We found this fantastic recipe in Attracting Birds to your Backyard by Sally Roth:

2/3 cup all-purpose flour
1 1/3 cup whole-wheat, buckwheat, or other whole-grain flour
2 teaspoons baking powder
1 cup sunflower seeds, raw
1/2 cup finely chopped raisins
1/2 cup finely chopped dried cherries
1/2 cup chipped unsalted peanuts
1/4 cup finely chopped dried apritos
1/2 cups chopped apples
6 slices bacon, cooked and crumbled (since we are vegetarians, we ommitted this and added a few tablespoons of flax seeds which are rich in healthy fats instead)
1 egg, beaten
2 tablespoons honey or molasses
1 cup milk
3 teaspoons melted butter

  1. Grease a mini muffin pan.
  2. Combine the flour, baking powder, sunflower seeds, raisins, dried cherries, peanuts, dried aprictos, apples and flax seeds (or bacon if you are following the original recipe)
  3. In a separate bowl, beat together the egg, honey, milk, and melted butter.
  4. Pour the liquid mix into the dry ingredients and stir to combine.
  5. Spoon the batter into the muffin pan, filling each cup 2/3 full.
  6. Bake at 400 for 20 to 25 minutes
  7. After the muffins cool, stick them on a spiked feeder, or serve whole in a tray feeder or on the ground.


My son actually really enjoyed snacking on these muffins too.

Christmas Tree for the Birds


Rather than put your Christmas tree on the curb for the chipper, or toss it into the woods, consider planting it in a bucket of sand and putting it outside for the birds. Since we have so much snow this year, we just dug a hole near the feeders on our deck and planted our Christmas tree in it. The tree branches provide shelter for the birds that protects them from the elements, predators, and gives them a place to rest. You can also have fun and decorate it with treats for the birds (of which they will be very appreciative). In our Christmas tree, we hung:


Raisin Mini-Wreath

I threaded golden and regular raisins onto flexible wire and shaped them into little wreathes.

Peanut Chains

Using and embroidery needle, a thimble, and some yarn/twine, I threaded unsalted shelled peanuts to form large chains to drape around the tree.

Orange Baskets

You can either slice oranges into 1/4 inch rounds or cut them into baskets like we did here.

Cookie Cutter Treat Ornaments


This is another recipe I got out of the amazing book, Attracting Birds to your Backyard by Sally Roth:

6 cups birdseed (we just used our usual mix, but in the book it suggests either using 4 cups millet, 1 cups flaxseed and 1 cup black oil sunflower seed or 4 cups chopped unsalted peanuts and 2 cups black oil sunflower seeds)
1 tablespoon butter
1/2 cup sorghum or molasses
1/4 cup sugar

  1. Spray cookie sheet or waxed paper on cookie sheet liberally with nonstick cooking spray and arrange cookie cutters on the sheet.
  2. Combine a seed mixture into a large bowl (unless you are using a premixed concoction like we did).
  3. Melt the butter in a large saucepan; add the molasses and sugar.
  4. Stir until the sugar is dissolved.
  5. Bring to a boil; cover and cook for about 3 minutes without stirring.
  6. Uncover and continue to boil without stirring until syrup reaches 290 degress F on a candy thermometer. IMMEDIATELY pour over the seed mix.
  7. Stir the mixture with a strong, long-handled wodden spoon until syrup is distributed evenly.
  8. Spoon birdseed mix into cookie cutters.
  9. Grease fingers and press very firmly into molds until seed mixture is to the depth of cookie cutter. Work quickly and carefully; molasses will be HOT!
  10. Thread a large upholstery needle with string and poke through treat to hang. You can heat the needle tip with a flame if you have trouble poking the needle through.

While we did have some bird visitors to our tree, our main visitor this year was a red squirrel. 


Here are some other ideas of how you can help our bird friends in the winter:
  • Plant evergreens and/or fruit and nut plants for the birds:
    • Holly tree (Ilex spp.)
    • Chokecherry (Aronia spp.)
    • Most Hawthorn trees (Crataegus spp.)
    • Eastern Juniper (Juniperus virginiana)
    • Sumac (Rhus spp.)
    • Crabapple (Malus spp.)
    • Viburnum shrubs (often called arrowwood)
    • Native roses (e.g., Rosa arkansana)
    • Virginia Creeper (Parthenocissus quinquefolia)
    • White Oak (Quercus alba)
    • Spruces
    • Cedars
    • Yews
    • Pines
    • Hemlock
    • Fir
     These provide food and shelter all year round, but are especially great in winter.
  • Hang some evergreen boughs or wreaths near/on your feeders
  • Hang old grapes
  • Put out day-old doughnuts
  • Hang out peanut butter stuffed pinecones (don't roll in birdseed;  not all peanut-butter eaters eat birdseed mix)

Sunday, November 10, 2013

Putting the garden to sleep for the winter

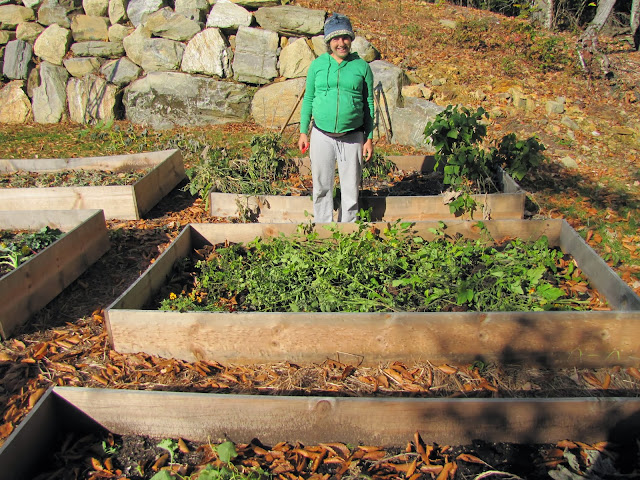
As we are well into autumn, and our second baby is due any time now, we made sure to take care of the dry sunny weekend days we had last month and put the garden "to sleep" for the winter. As a reminder, our raised beds were created this spring, as we only moved into our house last winter. So these gardens were very new and didn't have much time to "cook" (or decompose into soil) before we planted in them. Despite that, we still managed to have a decent harvest this season. You can see how we assembled these beds originally here: Post about assembling our lasagna style raised beds. One thing we weren't happy about after assembling our beds this spring is that we ran out of resources to fill them as much as we would have liked. So this fall, we decided to top them off with all sorts of goodies so that they would be nice and full for next spring. Here's what we did (note that at the end of most steps I indicated if this was a carbon or nitrogen rich layer as a reference for when you assemble your own raised beds):

1. First we collected the last of the veggies.


2. Then I chopped down/pulled out all of the plants. For the stawberry plants, I was careful not to pull out any roots, and just cut them down so they were less than an inch high. For the rest of the beds, I mainly pulled plants up and broke them apart into smaller pieces, leaving the plant matter in the beds to return nutrients back to the soil.  I left some roots intact to maintain a little of the soil structure. (Nitrogen)


3. We sprinkled bonemeal over each of the beds, which is an excellent source of phosphorous. This is very beneficial for the strawberry plants in particular.


4. Next we spread out the rest of the matured horse manure we had from the spring as a compost layer. (Nitrogen)


5. At this point, we wanted to cover the strawberries up as we didn't want to make a bunch of new soil on top of them. So we covered them with a bale of straw (which ended up being about 6 inches deep) to protect them from frost. (Carbon)


6. For the remaining 5 beds and our little teepee, we added several more layers of mulch in hopes of creating a rich soil to plant in this spring. First we added 4 bags of chopped, dead leaves to each bed. Note that after each layer of mulch, I watered the garden thoroughly to help weigh the materials down and kick start the decay process. (Carbon)


7. Next we added a layer of seaweed that we collect off the surf on the beach. Remember, at least here in Maine, it is illegal to harvest live seaweed without a permit. You must collect the stuff that washes up on the surf, and you want to avoid any that is already starting to rot. Going to the beach after a storm is a great time to collect seaweed. Once home, make sure you thoroughly rinse off the seaweed so that you aren't introducing a lot of salt into the garden. Salt will leach nutrients from the soil. (Nitrogen)


8. We added another 2 bags of chopped leaves to each bed, since we have so many readily available. (Carbon)


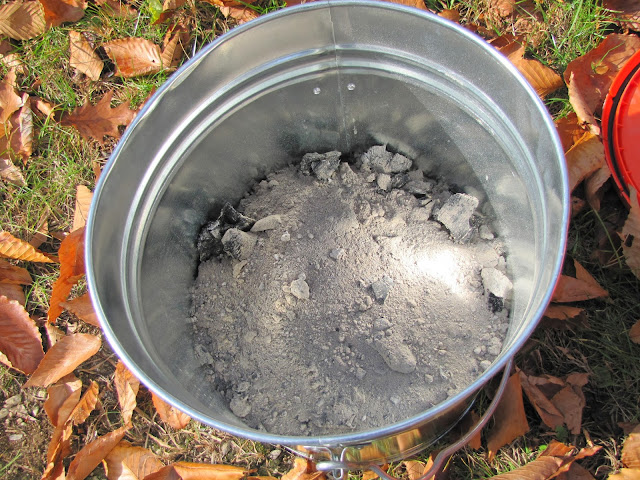
9. Next we distributed a couple buckets of wood ash collected from our family's wood stove. Wood ash contains potassium (or potash) which is a valuable nutrient for crops. (Carbon)


10. We bought a couple bags of  organic Coast of Maine brand potting soil to sprinkle on the top of the beds. This potting soil contains peat and organic compost, and will allow for the seeds to have a nice texture to be planted in next spring if the other layers aren't well broken down yet. (Nitrogen and Carbon)


11. Finally, we topped each bed, and around the teepee with straw as a weed-blocking and insulating layer. In the center of the teepee, we laid down a bag of Coast of Maine brand Dark Harbor Blend Enriching mulch in the middle of the teepee so that it will be a little more pleasant to sit down on this coming spring. (Carbon)


Hopefully we will have an even more successful garden next spring now that the beds are nice and full and will have time to decompose a bit over winter. I hope that you all had excellent success with your gardens this summer, and if you didn't get around to making a garden, you still have plenty of time this fall to make a bed or two. When assembling your own raised beds, remember that you do not need to use the exact ingredients we used. You can use whatever resources are more readily available to you...the important part is that you use a mixture of carbon and nitrogen rich layers.

Wednesday, October 23, 2013

Prevent birds from smashing into your windows

Have you ever heard that dreaded "thump" of a wild bird smashing into your window? You run to go check, sometimes seeing just little pin feathers on the ground or stuck on the glass, but most of the time one of the little birds that you've been so dedicated to feeding lying lifeless below the window. I think it is one of the most horrible sounds in the whole world. We work so hard to provide both migratory and resident wild birds with food and shelter, and it feels so awful when one of them dies because your house is in their way and they can't see the glass.


About a month ago, this little goldfinch flew into our big glass doors while my son and I were eating breakfast and watching the birds at the feeder. I was horrified. I rushed to see if there was anything I could do, but the poor thing died pretty quickly. I made a decision right then that I would do everything in my power to prevent an incident like that from occurring again. So I did some research on how to prevent birds from smashing into windows. What I didn't realize is how huge a problem windows are for birds; nearly a billion birds are killed each year from flying into glass! Here is some information I found from the Mass Audubon:
It is estimated that over 100 million birds die in the United States each year as the result of collisions with windows. Research has determined that birds hit every size window: at any height (from a one-story house to high-rise building), anytime, day or night. Window strikes can be deadly for both large and small bird species.
Many of the deaths occur when migrating birds fly into illuminated, high-rise buildings. Twice annually, migrating birds travel to and from their wintering and breeding grounds, a distance anywhere from a few hundred miles to a few thousand miles, depending on the species. For many migrants, these long-distance flights take place at night and, because they are attracted to light, thousands die or are injured when they strike illuminated buildings, especially on foggy or rainy nights.
In residential areas and office parks, windows often reflect nearby trees, shrubs, or sky. Birds do not understand the concept of reflection. When they attempt to fly into the landscape they see, they strike the barrier they can't see - the glass. A bird in a hurry can fly into a window with enough speed to be killed or, if it is lucky, stunned. Predators, especially domestic cats, often take birds that are not killed on impact.
As someone who cares deeply about conservation and is working towards living in harmony with nature, I felt very upset to be a contributing factor to the decline of migratory bird populations. So right away I purchased a bunch of window decals to put our big glass doors in front of the feeders. Hopefully they make a difference.


Here are some other suggestions that Glenn Phillips of the NYC Audubon and the Mass Audubon makes on how to prevent collisions:

- Bird feeders should be placed within three feet of a window, so that birds visiting the feeder cannot get up enough flight speed to hurt themselves.

- Break up the reflection. It is the reflection that fools the birds, so you need to signal the birds that this is not a safe flying zone. Window decals in the shape of hawks are sold to reduce window strikes, but the hawk shape is unimportant (it doesn't fool the birds). Any decals or stickers that are at least 6 inches in diameter can be used. Be sure to place several on the outside of the window, one foot apart, both horizontally and vertically. There are now decals that contain a component that brilliantly reflects ultraviolet sunlight, when placed on the outside of the window. This ultraviolet light is invisible to humans, but glows brilliantly for songbirds. The decals, shaped like maple leaves or butterflies, are about 4 by 4 inches (this is what we used). Another product uses the motion of brightly colored poultry feathers to warn birds away from glass. It is believed that birds have an aversion to loose, fluttering feathers because they associate them with the attack of a predator. The feathers hang from a five-foot length of monofilament line that attaches to the outside of the window with suction cups.

- Installing a pattern on a window where birds are known to hit can be uncomplicated and inexpensive. Patterns with negative space no greater than 4 by 2 inches, the size of a hand, are most effective.

- Place vertical tape strips at a maximum of 4 inches apart or horizontal strips a maximum of 2 inches apart. ABC BirdTape, is long-lasting and more aesthetically pleasing than masking tape or electrical tape, though all are effective. Be sure to place the tape on the outside of the window for maximum effectiveness.

- Soap windows, or use window paints or tempera paints to obscure most of window.

- Purchase or make your own window gel clings. Be sure to space them no more than 4 inches apart horizontally and 2 inches apart vertically.

- Draw blinds and move indoor plants away from windows. This will not work if there are strong reflections of the landscape in the window.

- Install a frosted or opaque window film. Collidescape is a film that looks opaque from the outside, but allows views out. Films are most effective when applied to the outside of the window. Most films are not guaranteed when placed on the outside surface, but many are reasonably long-lasting on these surfaces.

 - Install awnings, louvers, lattice work, or shades in front of windows.

- Install mesh window screens.

- Install unobtrusive netting in front of window. A company called Bird B Gone has designed several types for glass windows and facades.

- Cover the window with a non-reflective material. There is a commercially available film for window exteriors which claims to reduce the reflectivity of windows without affecting the light entering the room.

- Cover the window with an impact-absorbing barrier Windows can be covered with a screen that is attached to the window using hooks or suction cups. This not only reduces the reflection, it prevents injury by cushioning the bird if it inadvertently flies toward the window. It also prevents territorial birds from attacking their reflection in the glass.

- The ultimate solution would be a glass that is visible to birds but not humans. A product called Ornilux Mikado, manufactured in Germany by Arnold Glass, incorporates an ultraviolet spidery crisscross pattern within the glass visible to birds but nearly invisible to us.


Please save some birds lives' and try to prevent window collisions at your home. You can make a difference!

Friday, October 4, 2013

Fruits of our Labor: About our harvest in this first year of having our lasagna style raised beds

This summer, our garden was on a bit of a slow schedule; all of our plants produced, but much later than I would have anticipated. This had some unfortunate consequences. Perhaps the biggest issue is that right now we have loads of green tomatoes, but we are now in fall and have already had a couple nights of frost. Those tomatoes are never going to turn red, and saddly this mean we only were able to eat one delicious tomato from our garden all summer. We did get some of the little orange tomatoes, but only one or two a day, and my two year old son always gobbled those right up. I really wanted to eat some of them, but who is going to say no when their toddler wants to eat vegetables? Not me.


Our multi-colored zucchini had loads of blossoms, but only a couple ever got big enough to pick. Now it's been too cold for them and the tiny fruits have rotted into mush or have been nibbled on by our friendly neighborhood mammals. The ones we did get to eat however were delicious.


I was fairly certain that our rainbow chard and broccoli were both failed attempts this year. But both are still currently produced and we have been enjoying cooking with these fresh veggies.


An Indian inspired stir fry made from mung beans, and rainbow chard and yellow zucchini from our garden

Our kale did okay; at one point a bunch of the kale got eaten, but it managed to spring back and I've been able to harvest it a couple times. We used it mainly to make into smoothies (1/4 cup kale, 1/2 banana, 10 green grapes). My son loves these, and it's such a great way to get green veggies into his growing body.

Harvesting kale for smoothies

Our cucumbers are really late. When everyone else we know was handing cucumbers out because they had more than they knew what to do with, ours were still flowers and tiny little buds of fruit. Now, in October, we have probably a dozen or so cucumber to pick and more on the way. Hopefully we will be able to enjoy them before the cold weather destroys them. We have been enjoying slicing them up to have with meals, in cucumber sandwhiches, or just snacking on whole cucumbers while we play outside. They have a delicious flavor!

Cucumber hanging from our trellis
Our spinach failed. Our corn failed too; it never really got big enough, and then the beans that we planted alongside them went wild and knocked them over. On the bright side, we had a fantastic bean crop this summer. Both our bush beans and pole beans produced huge amounts of beans, and we had lots of fresh and  steamed beans all summer.

Our multicolored bush beans

The other plant that did particularly well this year was the baby mesclun mix. The lettuce loved the shade of the cucumber plants (we grew it under the trellises), and we ended up having more mesclun mix than we could keep up with. It was nice never having to buy lettuce all summer.

Bush beans, cucumbers and baby mesclun mix

salad made from mesclun mix, cucumbers, peas and nasturtiums all  from our garden

Still showing promise are our little pie pumpkins. My son and I have really enjoyed going out to check on them each day, and now they are starting to turn orange. I am looking forward to the day we can harvest them and make some yummy pumpkin pies!


So, while it wasn't as amazing a harvest as I had hoped this season, we still got a lot of delicious vegetables and I feel very hopeful about next year. We will be able to put in lots of new layers into our lasagna gardens this fall when we eventually "but them to bed", and this time they will have all winter to cook and become deliciously fertile soil. It has been so much fun going out into the garden every morning with my toddler and seeing how excited he gets to help Mama pick beans, or tomatoes, or kale. Just to be able to show him how plants grow, then to have him help me cook them into delicious meals was worth all the effort we put into our little garden.

Tuesday, July 30, 2013

Pea Teepee

This spring, while we were putting together our raised beds, we also decided to make something that our one year old son might enjoy during the summer: a pea teepee.  I got the idea from a farm I worked at that used to have kids make a pea teepee as part of their April Vacation Camp. It is just a nice, sheltered area that kids can crawl into and be hidden from the sun while munching on healthy snacks.

To construct it, we did a bit of frame-less lasagna gardening. We spread out some rotted horse manure, but down a weed block layer of paper products, then added a bit more manure to encourage all the worms and helpful insects to work their way to the surface. Then we added a few layers of whatever we had to spare to build a soil layer. We put down leaves, a bit of seaweed, some peat moss, and potting soil since we didn't have much to work with. Finally, we topped it off with a weed block layer of organic bark mulch.


The actual teepee was constructed using some tall (maybe 7 or 8 feet tall), straight sticks we found in our yard. We tied them together at the top with twine, and then securely buried the ends in our little circular lasagna garden. I then went around and secured the sticks together with twine, making sure to leave an entrance. I went around the teepee several times at about one foot intervals. Then, in-between the sticks, I added some twine vertically so that the pea plants would have something beside the sticks to climb up.

Since peas love cooler weather, we planted pea seeds right away. I made little pockets in the mulch with potting soil and planted them all around the teepee. After about two weeks, we started seeing our first little sprouts.


The sprouts were not coming in evenly though, so I went ahead and planted another round of seeds to fill in the gaps. Those came in much more successfully, and soon our teepee was surrounded by young plants.

Everyday, my son enjoyed running into the teepee while I watered the peas. The pea plants grew full and healthily, but they never got as tall as I had hoped they would. In the end, when they started flowering and producing pea pods, I don't even think they had climbed two feet up the teepee. I was rather disappointed because this didn't create the little hideaway I had been hoping for, but my son still enjoyed playing inside, and loved snacking on peas with me on those early summer days.


In mid July we harvested the last of the peas. Some of the plants were starting to shrivel up, and they weren't producing any new flowers. My son and I had fun picking the last of the peas, shelling them out on the grass, and munching on fresh peas. I then pulled up all the plants and laid them around the teepee to start decomposing and put nutrients back in the soil for next year.


pea plants laid around to decompose

Next year I will have to do a little more research before purchasing my pea seeds. I need to make sure I find a variety that grows tall so we can fill out the teepee a little bit better. I might even end up trying something other than peas depending on where my research leads me.