Showing posts with label Conservation. Show all posts

Sunday, January 25, 2015

Gardens for the Birds and the Bees

In this family, we love our birds and our bees and go out of our way to encourage their presence around our home. We love them because they are fun to watch, because they minimize populations of pesky insects that like to bite us, and they help to pollinate the yummy food we grow in our garden.

Bee Garden


This was actually my oldest sons garden. I tried my hardest not to put any of my own effort into it so that it was his sole responsibility. At the time he was 2.5 and just needed some nudging and reminding to water it every now and then...fortunately this garden was pretty self sufficient.

We planted the garden in the middle of some logs that we have in the yard for the boys to climb on. I helped him to dig off the sod (we didn't have the time or materials to prepare a lasagna style garden like we usually do). Then I asked him to plant the seeds, rake them in, and water it. The seeds we planted just came from a packet I found at our local nursery full of plants that bees love.


Being a bit of a perfectionist, it was a little hard to watch the seeds not being spread evenly around, but I bit my tongue. Once he raked them in they were better distributed anyways. 


He collected water from our "rain bucket" (used to catch water from our leaky gutter) with his little watering can and made trips back and forth until the garden had enough to drink.


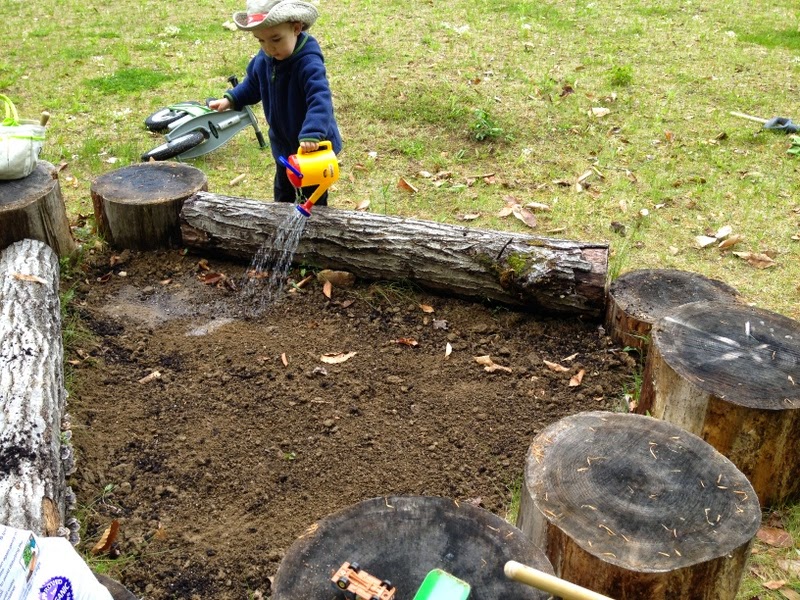
It was fun to watch him water his garden and notice all the new plants popping out of the ground.


Eventually there were lots of flowers in bloom, lots of bees, and it was a pretty sweet place to hang out and play around.


The funny thing about this garden is because the soil was so rocky and poor, the flowers were miniatures of the ones in our other garden.


At the end of the season, I put in some bonemeal, some compost and some leaves to make the soil a little bit richer. It will be interesting to see any differences this summer if we decide to continue to use that spot as a bee garden. Here is a card I stumbled across with ideas of what you can plant in your very own bee garden:


Birdseed Garden

I was very excited to plant this garden! Prior to this, we didn't have a flower garden, and I was looking forward to having a great excuse to put a lot of time and effort into its implementation. We decided to place it near where we have our bird feeders so we would be able watch the birds feast in the garden. Before this summer, I had never actually seen birds eat seed from flowers, so I was excited to see if they actually flocked to the garden and how they went about dismantling the flowers.

I wanted to try to make it into a keyhole garden, which is a type of garden I read about in Gaiss's Garden: A Guide to Home-Scale Permaculture by Toby Hemenway (pgs. 37-42). A keyhole garden is kinda of just what it sounds like; it's a circular garden with a path to the center so that it resembles a keyhole. Why on earth would you make a garden this shape instead of a square or a rectangle? Well there are several reasons:
  • More space for plants. The shape of the garden determines how much of the area can be used for planting as opposed for paths that allow us to reach the plants. Every place we step in the garden compacts and rather destroys the soil making it  not plantable. A keyhole garden minimized the space used as a path to one small line from witch you can reach all the plants. In Gaia's Garden, there is an excellent diagram depicting this. It compares the amount of path needed for three different shaped gardens containing 50 square feet of planting. A typical garden with paths in between each row of plants will require 40 square feet of path. Raised bed need 10 square feet of path. A keyhole bed only needs 6 square feet of path.
  • More aesthetically pleasing. Bringing curves to a garden takes a away that "cornfield" look that comes from planting in rows. Nature is always curves and meanders around, and having a circular spaced garden "lend surprise and whimsy to a garden" (p. 38).
  • Can trap warmth. By aiming the central path south and putting tall plants in the back, the bed creats a U-shaped sun bowl that can create warmth inside for heat-loving plants.
  • Easy to water. A single, small sprinkler in the center can easily water the entire bed.
Here is how we made our keyhole bed:

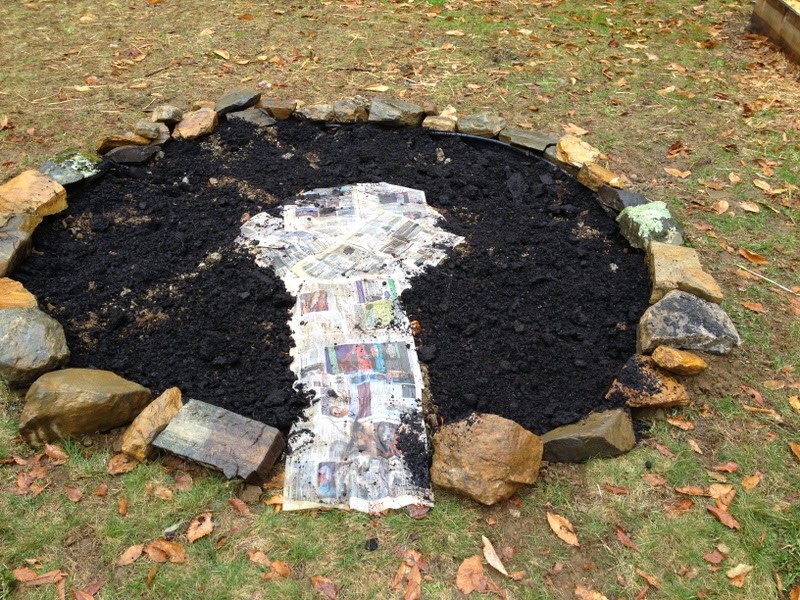
1. First we measured out a 10 foot diameter circle with stones as markers and a 18 inch path with a two foot turn around area in the center. We removed all the sod from the planting space, but you could very well do a lasagna garden right onto the grass layer...we just didn't have the time or materials to get a lot of layers and wanted to give the garden a good start.


2. We lay down wet news paper inside the entire circle (path and planting area) as a weed suppressor.  Then we put down a layer of organic compost (made of manure and peat from the Coast of Maine) in the planting area. We also made a border around the entire bed using loose stones from our rock wall.


3. We added several bags of crushed leaves that accumulated in our yard and we collected using a leaf blower/vacuum. We wet the leaves thoroughly to aid in their decomposition.


4. We put down a layer of organic potting soil on top to give the seeds a nice place to germinate. We also placed stones along the path.


5. Finally, we put down Coast of Maine enriching mulch on the path to keep the weeds out. Now it was ready to plant!


I decided to use the diagram I found in Sally Roth's Attracting Birds to Your Backyard (p. 53) as a guide for what to plant in our garden:


By the end of the season I believe I planted Bachelor's buttons, Purple coneflower, cosmos, zinnias, foxtail millet, switch grass, a couple types of sunflowers (Autumn Beauty and Vanilla ice), tickseed, and black eyed susans. Some things, didn't really come up so I had to go get new seeds and try replanting (creeping zinnias). Some things that I started inside didn't transplant well (sunflowers and purple coneflowers) and needed to be replanted...but most didn't have enough time to mature. But some plants ended up doing very well, like the zinnias, foxtail millet, bachelor buttons and cosmos, and the whole family was very excited about their beautiful presence in our yard.

bachelor buttons were the first to pop up and flowered all summer long


More importantly though, the birds and the bees loved this garden as well. The most frequent bird visitors by far were were goldfinches, morning doves and chipping sparrows. The doves like to peck around under the cool shade of the flowers green foliage while we delighted in watching the goldfinches' acrobatics as they swung around on the floppy cosmos. Hummingbirds often buzzed along side the bees to sip on the nectar of colorful zinnias.


Since we do not have a bird bath, and it's important to have an easy source of water for our bird friends, I picked up a terra cotta  pot base from our local nursery to place on one of the border stones and kept it full of fresh water. I never saw it used as a bird bath per say, but everyday we saw mourning doves and finches perched on the edge enjoying sips of cool water. We even had chipmunks visit the little pool regularly.


If you are interested in starting your very own birdseed garden, there are numerous beautiful plants that you can chose from! Here is a list to help you get started:
  • Bachelor's Buttons (Centaurea cyanus) 
  • Zinnias
  • Foxtail Millet (Setaria italica) 
  • Switch Grass (Panicum virgatum) 
  • Autumn Joy Sedum (Sedum 'Autumn Joy') 
  • Black-eyed Susan (Rudbeckia) 
  • Blazing star (Liatris species) 
  • Coreopsis (also known as tickseed) 
  • Cosmos 
  • Goldenrod (Solidago species) 
  • Purple coneflower (Echinacea purpurea) 
  • Purple majesty millet (Pennisetum glaucum 'Purple Majesty') 
  • Sunflower (Autumn Beauty, Saw-toothed sunflower, Golden Goddess, Mexican sunflower, etc) 

Happy planting! The birds and the bees will thank you!

Friday, May 9, 2014

Bat houses

Zipping, Flipping, 
Skating, Chasing
I watch their preformance in the twilight.

The sun is slipping,
The sky is slate and indigo
I try to rub the sleep from my eyes.

Gentle soul,
you do not frighten me,
I am happy to see you here.

You feast on mosquitos
that cause me grief
and make me itch and fear.

Dancing bat
how fast you dart! 
Only glimpses now in the moonlight.

Not with sight,
but with sound
you will never cease to amaze me.

So stay with me
safe and warm
in the little house I made thee.

All of the poetry I found about bats when I quickly scanned the internet disappointed me, as they were all about how they were frightening creatures of the night; mice with fangs and human faces. I find this incredibly misleading and disheartening in a world where bats populations are slowly fading but needed more than ever before. Bats in Maine are are threatened by habitat alteration, commercial pesticide use, control practices, and wind power development. They are also threatened by the White-Nose Fungus (Geomyces destructans) Disease. White-nose syndrome causes hibernating bats to awaken more often during hibernation and prematurely use up fat reserves needed to survive the winter. For those of you who don't know very much about bats, take a minute to read this quick introduction that I found on the Bat Conservation International website, it's fascinating:

Bats are essential to the health of our natural world. They help control pests and are vital pollinators and seed-dispersers for countless plants. Yet these wonderfully diverse and beneficial creatures are among the least studied and most misunderstood of animals.
Centuries of myths and misinformation still generate needless fears and threaten bats and their habitats around the world. Bat populations are declining almost everywhere. Losing bats would have devastating consequences for natural ecosystems and human economies. Knowledge is the key. 
The more than 1,200 species of bats – about one-fifth of all mammal species – are incredibly diverse. They range from the world's smallest mammal, the tiny bumblebee bat that weighs less than a penny to giant flying foxes with six-foot wingspans. Except for the most extreme desert and polar regions, bats have lived in almost every habitat on Earth since the age of the dinosaurs.
Bats are primary predators of night-flying insects, including many of the most damaging agricultural pests and others that bedevil the rest of us. More than two-thirds of bat species hunt insects, and they have healthy appetites. A single little brown bat can eat up to 1,000 mosquito-sized insects in a single hour, while a pregnant or lactating female bat typically eats the equivalent of her entire body weight in insects each night.
Almost a third of the world's bats feed on the fruit or nectar of plants. In return for their meals, these bats are vital pollinators of countless plants (many of great economic value) and essential seed dispersers with a major role in regenerating rainforests. About 1 percent of bats eat fish, mice, frogs or other small vertebrates.
Only three species, all in Latin America, are vampires. They really do feed on blood, although they lap it like kittens rather than sucking it up as horror movies suggest. Even the vampires are useful: an enzyme in their saliva is among the most potent blood-clot dissolvers known and is used to treat human stroke victims.

Here in Maine we have 8 species of bats, the most common of which are the little brown bat and the big brown bat. These bats both eat moths, beetles, mosquitoes, and flies. As bats don't do well in cold temperatures (because there aren't really any insects to eat) they either migrate to warmer places or use a hibernation site called a hibernaculum. The hibernaculum protects bats from predators, light, noise, and other disturbances.

Little Brown Bat (batworld.com)

One fantastic way you can help boost bat populations here in Maine, and to encourage them to live on your property (excellent mosquito control) is to instal a bat house. Often times bats will prefer bat houses over natural structures and bat houses can even become a hibernaculum. They are more likely to live in your bat house if it is in a warm, sunny spot (either on the south side of a house or on a pole) in an open area at least 20 feet from trees. They also like to be not to far from a water source, which is easy in Maine since there are so many rivers and lakes distrubuted across the state.

We installed our own bat house onto our house early this spring. Not only do we want to help out the Maine bat populations, but we also have a lot of mosquitoes in the summer due to a vernal pool in our back yard. We are hoping that the bats will come gobble them up so we can enjoy our evenings outside more!


Here are some guidelines for installing a bat house in Maine from the Maine IF&W website:
  • If you are making a bat house to use in Maine, paint it with multiple coats of flat black exterior latex and place it where it will receive full sun. Maine bats need and seek a home that bakes in the sun – a nice warm place to raise their young – and one that lets them decrease their metabolic needs during roosting.
  • Build or buy a bat house that is at least two feet tall and 14 or more inches wide. Bigger is better. A roughened or screen-covered landing platform measuring three to six inches should extend below the house.

  • The house can be single-chambered or multi-chambered, but chambers should be three quarters to one inch wide; including variety in size will provide for the needs of different species.

  • The houses should be caulked during construction and (preferably) screwed rather than nailed. The idea is to create a tight microclimate inside the house, one capable of trapping both the heat of the day and the warmth generated by the bats themselves.

  • Place the house in full sun, preferably on its own pole; the next-best location is on the southern side of a building in full sun. The optimal temperature range is between 85 and 104 degrees F. Do not put it on a tree, which provides too much shade and is too close to hawk and owl perch sites. Keep the area around the entrance clear of obstructions for 20 feet.
We had purchased our house from a local greenhouse, and on the instructions it said not to paint it. But everything I've read about installing bat houses say to paint it black! I'm also not sure the house is big enough. So we might end up altering this one, or making a completely new one, but its a start.

Yesterday, while I was outside at twilight, I caught a glimpse of something flying just over my head. I brushed it off as a bird until something in my unconscious mind reminded me it was dark and the birds were sleeping. When I looked up again, I saw the beautiful site of a bat zigging and zagging in the moonlit sky. It was circling and darting with such speed and grace, I couldn't help but take a moment to stand there quietly with my toddler and observe it. I do hope this means that some bats decided to move into our little house. Even if not, I am very excited to see them visiting our property!

If you want to read more about bats, here are some great resources (include info how to build/instal houses):
Bats in Maine: Maine IF&W and Maine Audubon
Bat Conservation: Bat Conservation International and Organization for Bat Conservation

Monday, April 14, 2014

Birdhouses

Somehow I completely neglected to write about the birdhouses we installed last winter, but I will remedy that now. So far we have two birdhouses: one with a 1 1/8" entrance hole which is well suited for chickadees, and one with a 1 1/4 " entrance hole which is well suited for downy woodpeckers, titmice and nuthatches.


These birdhouses we made from a pre-cut kit from our local nursery; we just had to assemble the pieces and mount it to the tree. There are plenty of resources for building your own birdhouses from scratch, including one of my new go-to books Attracting Birds to your Backyard by Sally Roth. But the main things you want to keep in mind when building a house are:
  • The size of the birdhouse should be appropriate for the type of bird you are trying to attract (for instance chickadees like small houses, flickers like large houses, screech owls like extra-large houses, etc.).
  • The entrance hole size should be appropriate for the type of bird you are trying to attract.
  • The bird house shouldn't made out of treated wood (you don't want to poison the birds!).
  • If you want birds to nest in it that summer, you should try to get it up by late winter/very early spring.
Why go through all the trouble of installing bird houses in your yard? Their are numerous benefits:
  • Habitat Replacement. As man continues to develop, cavities that are appropriate for cavity-nesting birds become less available. It may not seem like putting up a bird house will make a big difference, but cavity-nesting birds really do have trouble finding nesting sites these days.
  • Native Species. Invasive species, like house sparrows, are numerous and out-compete native species for nest cavities. Appropriately sized and placed birdhouses can give native species a better chance.
  • Baby Birds. Who doesn't love seeing baby birds visit their yards and feeders?
  • Diversity of Species. Having a variety of birdhouses will attract a variety of bird species to visit your yard, giving you the opportunity to enjoy their colors, antics and songs. 
  • Protect the Ecosystem. Birds are a vital part of ecosystems, and by helping conserve birds, you are helping to promote healthier ecosystems (which benefits all life on earth).
  • Controlling Pests. Birds eat insects and will help to eliminate unwanted pests.
  • Weed Control. Birds enjoy eating weed seeds...which mean less weeding for gardeners.
  • Learning Opportunity. Birdhouse building is a great hobby, an easy way to teach children simple woodworking skills, and a great way to teach children how to care for the environment and develop and interest and love for wildlife.
I encourage everyone to have at least one birdhouse, they are a fantastic addition to any property!


Wednesday, October 23, 2013

Prevent birds from smashing into your windows

Have you ever heard that dreaded "thump" of a wild bird smashing into your window? You run to go check, sometimes seeing just little pin feathers on the ground or stuck on the glass, but most of the time one of the little birds that you've been so dedicated to feeding lying lifeless below the window. I think it is one of the most horrible sounds in the whole world. We work so hard to provide both migratory and resident wild birds with food and shelter, and it feels so awful when one of them dies because your house is in their way and they can't see the glass.


About a month ago, this little goldfinch flew into our big glass doors while my son and I were eating breakfast and watching the birds at the feeder. I was horrified. I rushed to see if there was anything I could do, but the poor thing died pretty quickly. I made a decision right then that I would do everything in my power to prevent an incident like that from occurring again. So I did some research on how to prevent birds from smashing into windows. What I didn't realize is how huge a problem windows are for birds; nearly a billion birds are killed each year from flying into glass! Here is some information I found from the Mass Audubon:
It is estimated that over 100 million birds die in the United States each year as the result of collisions with windows. Research has determined that birds hit every size window: at any height (from a one-story house to high-rise building), anytime, day or night. Window strikes can be deadly for both large and small bird species.
Many of the deaths occur when migrating birds fly into illuminated, high-rise buildings. Twice annually, migrating birds travel to and from their wintering and breeding grounds, a distance anywhere from a few hundred miles to a few thousand miles, depending on the species. For many migrants, these long-distance flights take place at night and, because they are attracted to light, thousands die or are injured when they strike illuminated buildings, especially on foggy or rainy nights.
In residential areas and office parks, windows often reflect nearby trees, shrubs, or sky. Birds do not understand the concept of reflection. When they attempt to fly into the landscape they see, they strike the barrier they can't see - the glass. A bird in a hurry can fly into a window with enough speed to be killed or, if it is lucky, stunned. Predators, especially domestic cats, often take birds that are not killed on impact.
As someone who cares deeply about conservation and is working towards living in harmony with nature, I felt very upset to be a contributing factor to the decline of migratory bird populations. So right away I purchased a bunch of window decals to put our big glass doors in front of the feeders. Hopefully they make a difference.


Here are some other suggestions that Glenn Phillips of the NYC Audubon and the Mass Audubon makes on how to prevent collisions:

- Bird feeders should be placed within three feet of a window, so that birds visiting the feeder cannot get up enough flight speed to hurt themselves.

- Break up the reflection. It is the reflection that fools the birds, so you need to signal the birds that this is not a safe flying zone. Window decals in the shape of hawks are sold to reduce window strikes, but the hawk shape is unimportant (it doesn't fool the birds). Any decals or stickers that are at least 6 inches in diameter can be used. Be sure to place several on the outside of the window, one foot apart, both horizontally and vertically. There are now decals that contain a component that brilliantly reflects ultraviolet sunlight, when placed on the outside of the window. This ultraviolet light is invisible to humans, but glows brilliantly for songbirds. The decals, shaped like maple leaves or butterflies, are about 4 by 4 inches (this is what we used). Another product uses the motion of brightly colored poultry feathers to warn birds away from glass. It is believed that birds have an aversion to loose, fluttering feathers because they associate them with the attack of a predator. The feathers hang from a five-foot length of monofilament line that attaches to the outside of the window with suction cups.

- Installing a pattern on a window where birds are known to hit can be uncomplicated and inexpensive. Patterns with negative space no greater than 4 by 2 inches, the size of a hand, are most effective.

- Place vertical tape strips at a maximum of 4 inches apart or horizontal strips a maximum of 2 inches apart. ABC BirdTape, is long-lasting and more aesthetically pleasing than masking tape or electrical tape, though all are effective. Be sure to place the tape on the outside of the window for maximum effectiveness.

- Soap windows, or use window paints or tempera paints to obscure most of window.

- Purchase or make your own window gel clings. Be sure to space them no more than 4 inches apart horizontally and 2 inches apart vertically.

- Draw blinds and move indoor plants away from windows. This will not work if there are strong reflections of the landscape in the window.

- Install a frosted or opaque window film. Collidescape is a film that looks opaque from the outside, but allows views out. Films are most effective when applied to the outside of the window. Most films are not guaranteed when placed on the outside surface, but many are reasonably long-lasting on these surfaces.

 - Install awnings, louvers, lattice work, or shades in front of windows.

- Install mesh window screens.

- Install unobtrusive netting in front of window. A company called Bird B Gone has designed several types for glass windows and facades.

- Cover the window with a non-reflective material. There is a commercially available film for window exteriors which claims to reduce the reflectivity of windows without affecting the light entering the room.

- Cover the window with an impact-absorbing barrier Windows can be covered with a screen that is attached to the window using hooks or suction cups. This not only reduces the reflection, it prevents injury by cushioning the bird if it inadvertently flies toward the window. It also prevents territorial birds from attacking their reflection in the glass.

- The ultimate solution would be a glass that is visible to birds but not humans. A product called Ornilux Mikado, manufactured in Germany by Arnold Glass, incorporates an ultraviolet spidery crisscross pattern within the glass visible to birds but nearly invisible to us.


Please save some birds lives' and try to prevent window collisions at your home. You can make a difference!