If you live in New England, as we do, the snow is waste deep and your raised beds just look like ab muscles on an otherwise smooth expanse of white. I consider myself a real Mainer as I truly appreciate each of the seasons and never wish them to be over before mother nature is ready for them to be. Yes, even winter. I don't get cabin fever in winter because I don't stay "in the cabin", even with two small children we get outside and snowshoe and ice skate. And we aren't inside, I have so many interesting things to do I cannot fathom feeling board. Plus, what is better than warming up with a cup of coffee by the wood-stove after a snowy adventure? Anyways, I digress. My point is that even though I love winter so much and take small pride in not wishing it over, looking over photos of our garden last year made me sigh. I can barely even fathom a time when my boys were outside in shorts and diapers, all of us barefoot, poking around in the garden and digging our hands into the warm earth. And yet, spring is just around the corner and we will be at that point again.
Looking back at photos from last summer also reminded me that I never wrote about our second year garden! So before I start ordering seeds for the spring, I am taking a moment to share what we planted last year and how things went.
Last year I used a great program called The Farmer's Almanac Garden Planner. It was free for a month, then you can pay a small annual fee to continue using it...I haven't decided whether I will do it again this year or not. It was fun to map everything out virtually though. Here was my plan for the raised beds:
I started everything from seeds again; some indoors and others pressed into little mounds of soil on the lasagna style raised beds.
Somethings, like the broccoli, did not transplant well into the garden and had to be resown with fresh seed. But by mid season, everything was lush and green and productive.
Instead of shelled peas, like we planted last year around our teepee (http://biophilliachomeowner.blogspot.com/2013/07/pea-teepee.html), we planted sugar snap peas which grow 6-8 feed tall. Not only was the teepee more lush and as I imagined it would look when I originally built it, but the peas were delicious and fun for my toddler to go out and pick and snack on all day.
I planted dragon's langerie for beans this year, admittedly because I loved the name and thought they looked really cool. I thought they were delicious, but they were quite mild and the rest of my family weren't overly fond of them. So they probably won't be making an appearance again this year.
The tomatoes were quite late in coming this year, but when they were finally ripe enough to pick they were plentiful and delicious. We especially love the little sungold tomatoes which are sweet and fun to pop into your mouth as your passing by.
I got a kale mix this time around, but that didn't work out so well. At first some critter was eating them all up. But they came back and there was plenty to eat. The only problem was, they were all kind of tough and not the best tasting so we didn't enjoy it as much as we had in the previous year. I'm probably going to go back to the curly green kale or something comprable this year.
The pumpkins grew well and we had quite a few that we were able to make into pies and pumpkin muffins in the fall.
The butternut squash on the other hand did not do so well. We ended up with one teeny one that I kept on the vine too long and was unedible after some frost damaged it.
The other plant that didn't do great were the strawberries. Not of their own accord though. Being second year plants now, we were all so very excited to be able to pick all the berries and eat them (last year we couldn't let them fruit so the plants would be well established). They grew beautifully and there was bountiful green berries. You could hardly look at the bed without your mouth watering.
However, we were not the only ones who thought the berries looked delicious, and only ONE SINGLE berry made it to becoming red. My two year old and I split it. This year we will have to cover the berries with netting or something. I WILL have those yummy berries.
We had many a bountiful harvest all summer long and well into autumn. We even noticed a huge difference in our grocery bill, which makes it especially worth it. I'm so glad that we are able to grow our own food and teach our children about gardening and eating fresh foods.
A novice's dive into the world of permaculture. Beginning with a blank slate, follow my journey as I attempt to convert my new home from a biodiversity desert to a nature lover's sanctuary.
Wednesday, February 25, 2015
Sunday, January 25, 2015
Gardens for the Birds and the Bees
In this family, we love our birds and our bees and go out of our way to encourage their presence around our home. We love them because they are fun to watch, because they minimize populations of pesky insects that like to bite us, and they help to pollinate the yummy food we grow in our garden.
Bee Garden
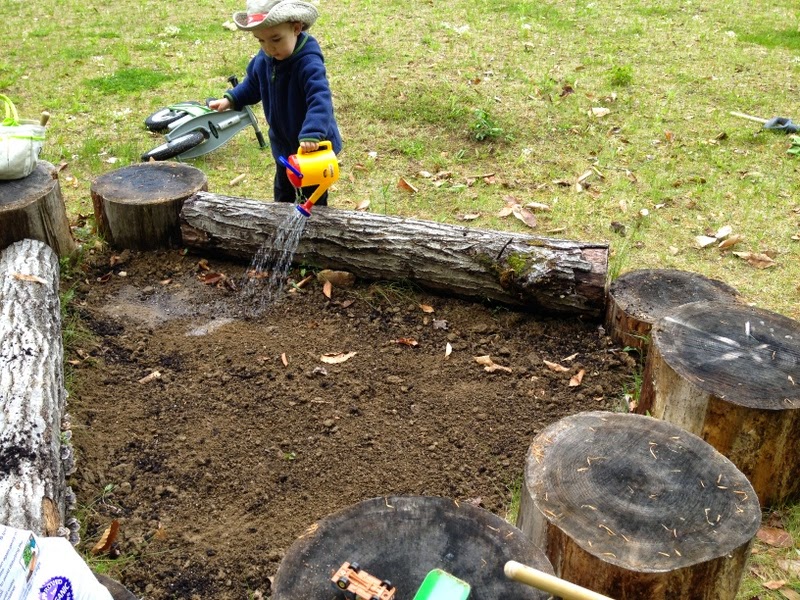
This was actually my oldest sons garden. I tried my hardest not to put any of my own effort into it so that it was his sole responsibility. At the time he was 2.5 and just needed some nudging and reminding to water it every now and then...fortunately this garden was pretty self sufficient.
We planted the garden in the middle of some logs that we have in the yard for the boys to climb on. I helped him to dig off the sod (we didn't have the time or materials to prepare a lasagna style garden like we usually do). Then I asked him to plant the seeds, rake them in, and water it. The seeds we planted just came from a packet I found at our local nursery full of plants that bees love.
Being a bit of a perfectionist, it was a little hard to watch the seeds not being spread evenly around, but I bit my tongue. Once he raked them in they were better distributed anyways.
He collected water from our "rain bucket" (used to catch water from our leaky gutter) with his little watering can and made trips back and forth until the garden had enough to drink.
It was fun to watch him water his garden and notice all the new plants popping out of the ground.
Eventually there were lots of flowers in bloom, lots of bees, and it was a pretty sweet place to hang out and play around.
The funny thing about this garden is because the soil was so rocky and poor, the flowers were miniatures of the ones in our other garden.
At the end of the season, I put in some bonemeal, some compost and some leaves to make the soil a little bit richer. It will be interesting to see any differences this summer if we decide to continue to use that spot as a bee garden. Here is a card I stumbled across with ideas of what you can plant in your very own bee garden:
Birdseed Garden
I was very excited to plant this garden! Prior to this, we didn't have a flower garden, and I was looking forward to having a great excuse to put a lot of time and effort into its implementation. We decided to place it near where we have our bird feeders so we would be able watch the birds feast in the garden. Before this summer, I had never actually seen birds eat seed from flowers, so I was excited to see if they actually flocked to the garden and how they went about dismantling the flowers.
I wanted to try to make it into a keyhole garden, which is a type of garden I read about in Gaiss's Garden: A Guide to Home-Scale Permaculture by Toby Hemenway (pgs. 37-42). A keyhole garden is kinda of just what it sounds like; it's a circular garden with a path to the center so that it resembles a keyhole. Why on earth would you make a garden this shape instead of a square or a rectangle? Well there are several reasons:
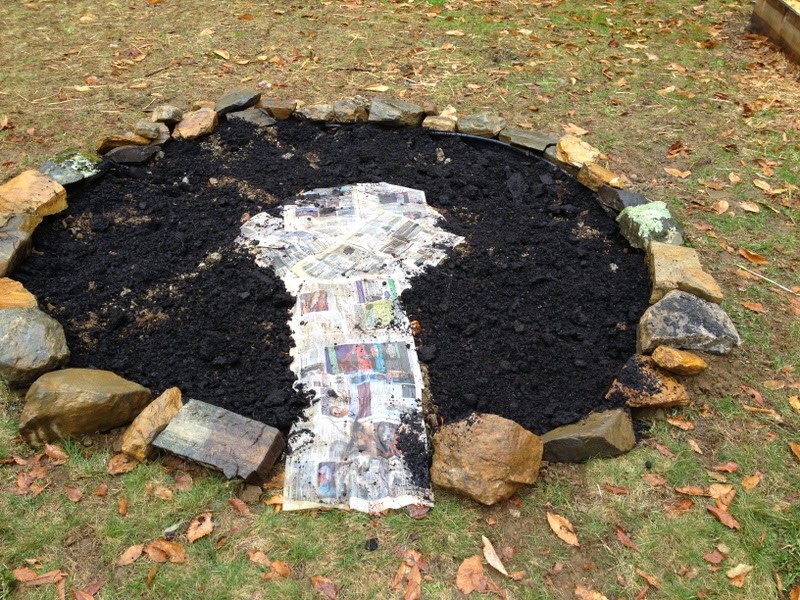
1. First we measured out a 10 foot diameter circle with stones as markers and a 18 inch path with a two foot turn around area in the center. We removed all the sod from the planting space, but you could very well do a lasagna garden right onto the grass layer...we just didn't have the time or materials to get a lot of layers and wanted to give the garden a good start.
2. We lay down wet news paper inside the entire circle (path and planting area) as a weed suppressor. Then we put down a layer of organic compost (made of manure and peat from the Coast of Maine) in the planting area. We also made a border around the entire bed using loose stones from our rock wall.
3. We added several bags of crushed leaves that accumulated in our yard and we collected using a leaf blower/vacuum. We wet the leaves thoroughly to aid in their decomposition.
4. We put down a layer of organic potting soil on top to give the seeds a nice place to germinate. We also placed stones along the path.
5. Finally, we put down Coast of Maine enriching mulch on the path to keep the weeds out. Now it was ready to plant!
I decided to use the diagram I found in Sally Roth's Attracting Birds to Your Backyard (p. 53) as a guide for what to plant in our garden:
By the end of the season I believe I planted Bachelor's buttons, Purple coneflower, cosmos, zinnias, foxtail millet, switch grass, a couple types of sunflowers (Autumn Beauty and Vanilla ice), tickseed, and black eyed susans. Some things, didn't really come up so I had to go get new seeds and try replanting (creeping zinnias). Some things that I started inside didn't transplant well (sunflowers and purple coneflowers) and needed to be replanted...but most didn't have enough time to mature. But some plants ended up doing very well, like the zinnias, foxtail millet, bachelor buttons and cosmos, and the whole family was very excited about their beautiful presence in our yard.
More importantly though, the birds and the bees loved this garden as well. The most frequent bird visitors by far were were goldfinches, morning doves and chipping sparrows. The doves like to peck around under the cool shade of the flowers green foliage while we delighted in watching the goldfinches' acrobatics as they swung around on the floppy cosmos. Hummingbirds often buzzed along side the bees to sip on the nectar of colorful zinnias.
Since we do not have a bird bath, and it's important to have an easy source of water for our bird friends, I picked up a terra cotta pot base from our local nursery to place on one of the border stones and kept it full of fresh water. I never saw it used as a bird bath per say, but everyday we saw mourning doves and finches perched on the edge enjoying sips of cool water. We even had chipmunks visit the little pool regularly.
If you are interested in starting your very own birdseed garden, there are numerous beautiful plants that you can chose from! Here is a list to help you get started:
Happy planting! The birds and the bees will thank you!
Bee Garden
This was actually my oldest sons garden. I tried my hardest not to put any of my own effort into it so that it was his sole responsibility. At the time he was 2.5 and just needed some nudging and reminding to water it every now and then...fortunately this garden was pretty self sufficient.
We planted the garden in the middle of some logs that we have in the yard for the boys to climb on. I helped him to dig off the sod (we didn't have the time or materials to prepare a lasagna style garden like we usually do). Then I asked him to plant the seeds, rake them in, and water it. The seeds we planted just came from a packet I found at our local nursery full of plants that bees love.
Being a bit of a perfectionist, it was a little hard to watch the seeds not being spread evenly around, but I bit my tongue. Once he raked them in they were better distributed anyways.
He collected water from our "rain bucket" (used to catch water from our leaky gutter) with his little watering can and made trips back and forth until the garden had enough to drink.
It was fun to watch him water his garden and notice all the new plants popping out of the ground.
Eventually there were lots of flowers in bloom, lots of bees, and it was a pretty sweet place to hang out and play around.
The funny thing about this garden is because the soil was so rocky and poor, the flowers were miniatures of the ones in our other garden.
At the end of the season, I put in some bonemeal, some compost and some leaves to make the soil a little bit richer. It will be interesting to see any differences this summer if we decide to continue to use that spot as a bee garden. Here is a card I stumbled across with ideas of what you can plant in your very own bee garden:
Birdseed Garden
I was very excited to plant this garden! Prior to this, we didn't have a flower garden, and I was looking forward to having a great excuse to put a lot of time and effort into its implementation. We decided to place it near where we have our bird feeders so we would be able watch the birds feast in the garden. Before this summer, I had never actually seen birds eat seed from flowers, so I was excited to see if they actually flocked to the garden and how they went about dismantling the flowers.
I wanted to try to make it into a keyhole garden, which is a type of garden I read about in Gaiss's Garden: A Guide to Home-Scale Permaculture by Toby Hemenway (pgs. 37-42). A keyhole garden is kinda of just what it sounds like; it's a circular garden with a path to the center so that it resembles a keyhole. Why on earth would you make a garden this shape instead of a square or a rectangle? Well there are several reasons:
- More space for plants. The shape of the garden determines how much of the area can be used for planting as opposed for paths that allow us to reach the plants. Every place we step in the garden compacts and rather destroys the soil making it not plantable. A keyhole garden minimized the space used as a path to one small line from witch you can reach all the plants. In Gaia's Garden, there is an excellent diagram depicting this. It compares the amount of path needed for three different shaped gardens containing 50 square feet of planting. A typical garden with paths in between each row of plants will require 40 square feet of path. Raised bed need 10 square feet of path. A keyhole bed only needs 6 square feet of path.
- More aesthetically pleasing. Bringing curves to a garden takes a away that "cornfield" look that comes from planting in rows. Nature is always curves and meanders around, and having a circular spaced garden "lend surprise and whimsy to a garden" (p. 38).
- Can trap warmth. By aiming the central path south and putting tall plants in the back, the bed creats a U-shaped sun bowl that can create warmth inside for heat-loving plants.
- Easy to water. A single, small sprinkler in the center can easily water the entire bed.
1. First we measured out a 10 foot diameter circle with stones as markers and a 18 inch path with a two foot turn around area in the center. We removed all the sod from the planting space, but you could very well do a lasagna garden right onto the grass layer...we just didn't have the time or materials to get a lot of layers and wanted to give the garden a good start.
2. We lay down wet news paper inside the entire circle (path and planting area) as a weed suppressor. Then we put down a layer of organic compost (made of manure and peat from the Coast of Maine) in the planting area. We also made a border around the entire bed using loose stones from our rock wall.
3. We added several bags of crushed leaves that accumulated in our yard and we collected using a leaf blower/vacuum. We wet the leaves thoroughly to aid in their decomposition.
4. We put down a layer of organic potting soil on top to give the seeds a nice place to germinate. We also placed stones along the path.
5. Finally, we put down Coast of Maine enriching mulch on the path to keep the weeds out. Now it was ready to plant!
I decided to use the diagram I found in Sally Roth's Attracting Birds to Your Backyard (p. 53) as a guide for what to plant in our garden:
By the end of the season I believe I planted Bachelor's buttons, Purple coneflower, cosmos, zinnias, foxtail millet, switch grass, a couple types of sunflowers (Autumn Beauty and Vanilla ice), tickseed, and black eyed susans. Some things, didn't really come up so I had to go get new seeds and try replanting (creeping zinnias). Some things that I started inside didn't transplant well (sunflowers and purple coneflowers) and needed to be replanted...but most didn't have enough time to mature. But some plants ended up doing very well, like the zinnias, foxtail millet, bachelor buttons and cosmos, and the whole family was very excited about their beautiful presence in our yard.
| bachelor buttons were the first to pop up and flowered all summer long |
More importantly though, the birds and the bees loved this garden as well. The most frequent bird visitors by far were were goldfinches, morning doves and chipping sparrows. The doves like to peck around under the cool shade of the flowers green foliage while we delighted in watching the goldfinches' acrobatics as they swung around on the floppy cosmos. Hummingbirds often buzzed along side the bees to sip on the nectar of colorful zinnias.
Since we do not have a bird bath, and it's important to have an easy source of water for our bird friends, I picked up a terra cotta pot base from our local nursery to place on one of the border stones and kept it full of fresh water. I never saw it used as a bird bath per say, but everyday we saw mourning doves and finches perched on the edge enjoying sips of cool water. We even had chipmunks visit the little pool regularly.
If you are interested in starting your very own birdseed garden, there are numerous beautiful plants that you can chose from! Here is a list to help you get started:
- Bachelor's Buttons (Centaurea cyanus)
- Zinnias
- Foxtail Millet (Setaria italica)
- Switch Grass (Panicum virgatum)
- Autumn Joy Sedum (Sedum 'Autumn Joy')
- Black-eyed Susan (Rudbeckia)
- Blazing star (Liatris species)
- Coreopsis (also known as tickseed)
- Cosmos
- Goldenrod (Solidago species)
- Purple coneflower (Echinacea purpurea)
- Purple majesty millet (Pennisetum glaucum 'Purple Majesty')
- Sunflower (Autumn Beauty, Saw-toothed sunflower, Golden Goddess, Mexican sunflower, etc)
Happy planting! The birds and the bees will thank you!
Subscribe to:
Posts (Atom)